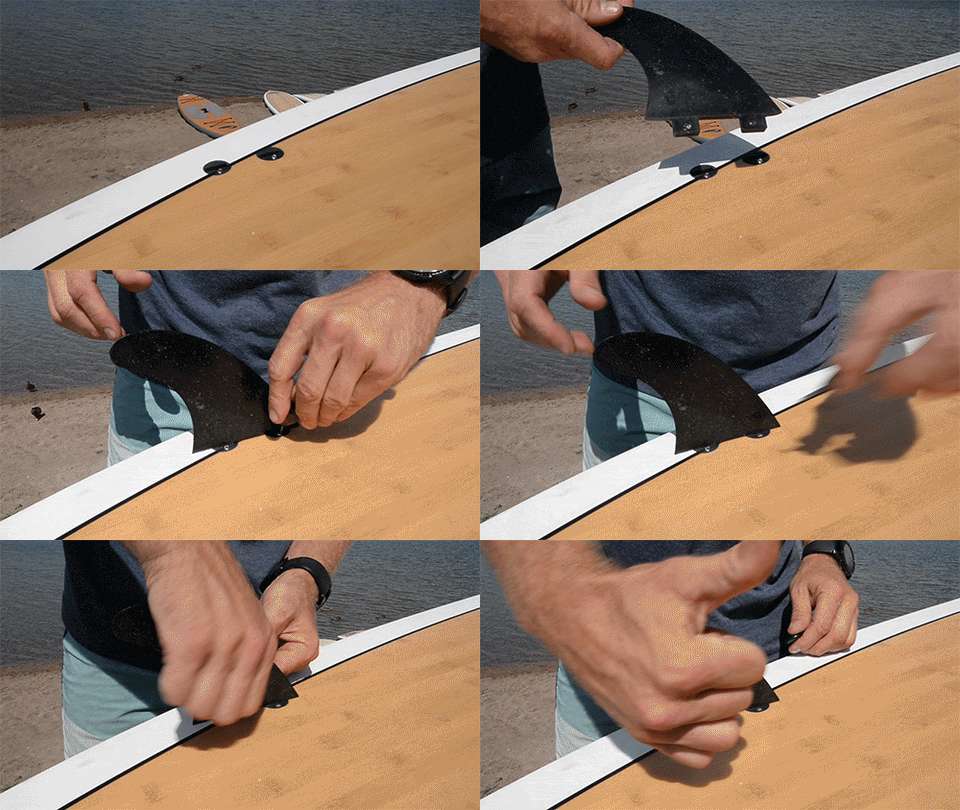
Installing the fin on your paddle board, regardless of type, is a simple process. First, identify what type of fin setup you have. Pictured below are the screw and plate (left) and quick-release (right) setups.

Installing a Screw and Plate Fin
1. With the plate loosely secured on the end of the screw, set it into the space in the middle of the box. While the screw is sticking up, you should be able to move the plate where you need it. Another option is to set the plate without the screw into the space and move it around using the tip of a Phillips screwdriver.

2. Move the plate to the front of the fin box (toward the nose of the board)
3. Line the metal dowel up with the space in the middle of the fin box and set it into the track. Note that the fin should curve with the point toward the back of the board.

4. Set the end of the fin with the screw hole into the fin box and line the plate up with the screw hole. Insert the screw and tighten it up until it is snug, but do not over-tighten.
Installing a Quick-Release Fin
1. Line the metal dowel up with the hole in the center of the fin box and place it into the track. Note that the point of the fin should be aimed to the back of the board.
2. Push the end with the roller until it snaps into the fin box channel. Below, you see that if the fin is at the front of box on a Paddle North Board, you can easily slip the roller into the slot in the middle of the fin box.

The immediate worry that many have about a fin that snaps into place via pressure is that it could come back out; the beauty of the universal fin is that it requires pressure from the direction of the bottom of the board and toward the nose, which is not the directionality that cruising through the water will apply.
3. If the fin box allows for movement, pull the fin to where you would like it to sit in the fin box. For more on fin placement, go to the section below.
Installing the Side Fins (Thrusters)
1. With a hex key or an appropriate Allen wrench, loosen the set screws until they no longer impede putting the side fins into their slots.
2. Line the side fins up so their point is aiming at the back of the board and insert them into the now open slots.

3. Tighten the set screws until the fin is secure. No need to over-tighten.
Fin Placement
You can move the fin back or forward in the fin box as you would like. As a rule of thumb, a fin placed toward the front of the box will provide more turning maneuverability and a fin placed at the back of the box will provide improved tracking and a straighter line.
The same goes for the side fins. Including them will improve your tracking. Leaving them off will give you a little more turning maneuverability, but decrease strokes per side.

Installing a Fin on an Inflatable Board
1. With the point of the fin facing the back end of the board, begin to slide the plastic base into the fin box track. Make sure to move the tab out of the way and clear the fin box out of any sand, dirt, or debris.
2. Apply pressure on the back of the fin and push it all of the way into the fin box until the slot for the tab is lined up. Depending on the board, you may need to push pretty hard or hit it with the palm of your hand.
3. Insert the tab into the slot and lock it into place.

This edition of How To: Paddle North is written by Cory Alford, content provider and Operations Manager for Paddle North.


Leave a comment
All comments are moderated before being published.
This site is protected by hCaptcha and the hCaptcha Privacy Policy and Terms of Service apply.